When you are having trouble with a door or all the doors in your home, there is a good chance that you have a hinge problem on your hands. Compared to any other type of hardware in the typical home, hinges do the most work. Not only do they support the weight of doors, but they also allow those doors to swing in and out of their openings.
With all the opening and closing, it is no surprise why hinges wear down over time. When it comes to all the common door hinge issues that most homeowners face, this guide will give you a head start on fixing those hinges for good.
Common Door Hinge Issues
Door hinges can last a long time but may fail at one point for one reason or another. It’s vital to know the common problems you may encounter and how to fix them. The following are examples of the challenges you are likely to face and helpful solutions:
Loose Hinges
Is your door starting to sag or hang crooked? If yes, then the hinges are probably weak. Loose hinges are one of the most common issues homeowners face, and it is caused by several factors, including:
- Wear and tear: Almost everything has a life span, including the hinges on your doors. The screws become weaker as you open and close the door. Eventually, the only option you might have would be to repair or replace them.
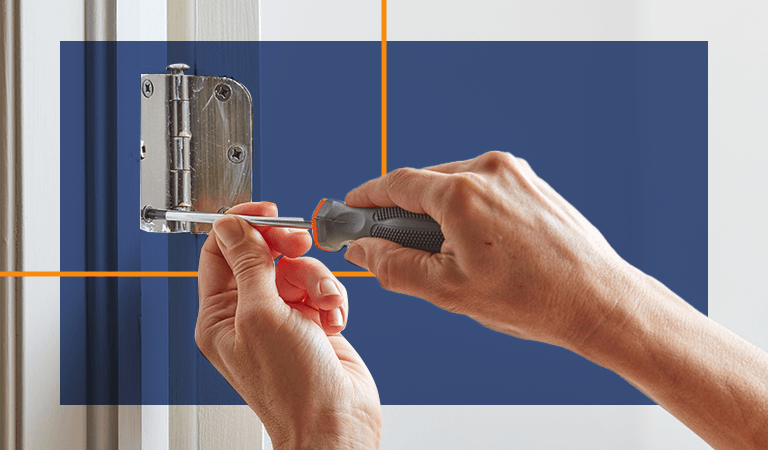
- Poor maintenance: Servicing your doors, especially the main entryways, is crucial. This allows you to spot damage early and correct it before it worsens. You can DIY most minor repairs using simple tools like a screwdriver to keep screws tightened.
- Intense usage: How you use the door directly impacts the hinge’s life span. Avoid hanging heavy loads on the knob because that can put weight on the slab, causing the screw to loosen over time. This problem is most common in homes with children since they may swing on the doors.
- Subpar-quality hinges: Always buy quality if you want to save money. Cheap hinges will only last a few months or years, forcing you to replace them again.
Sometimes all you need to do to fix the problem is retighten the hinge screws. However, if stripped holes prevent you from retightening them, a dowel might save the day. Wooden dowels are round pieces of wood in the form of a rod. They are available in varying lengths and diameters.
To remove the stripped screws from the hinges, you will need a piece of wood or support material, a drill bit, screwdrivers, an electric drill, wood glue, a wood saw, new screws and a wood dowel.
How to Fix Loose Door Hinges
Here is a step-by-step guide on how you can tighten your door hinges:
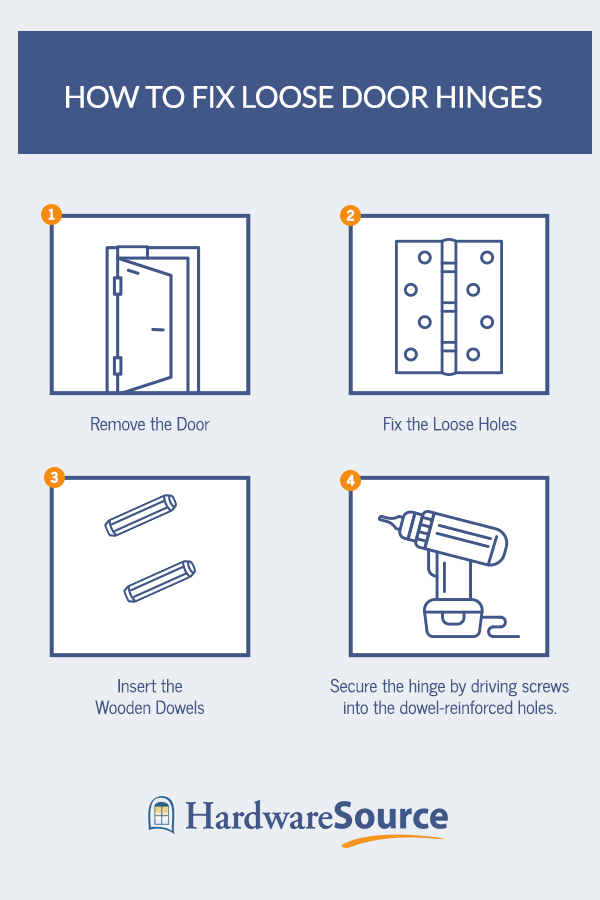
1. Remove the Door
Remove the door to get access to the hinges. It would be best to start by opening the door and wedging a piece of wood underneath to keep it level. Next, use a screwdriver or electric drill to remove the screws that attach the loose hinge to the door jamb. If there is paint over the hinge, slice around it carefully with a box cutter or utility knife to free it before removing the screw. Then, swing the leaf away from the jamb.
2. Fix the Loose Holes
It’s usual for the holes where the screws fit to expand and weaken over time, although different factors may accelerate the process. To ensure the door is stable, you must fix the holes so the hinges can hold the door tightly.
Attach a 3/8-inch drill bit to an electric drill and bore out the stripped holes, going at least 1 inch deep. Aim at making all the stripped holes a uniform size so you can fit a piece of wooden dowel seamlessly. After that, saw a 3/8 diameter of wooden dowel into 1-inch long pieces, the same depth as the holes.
3. Insert the Wooden Dowels
Spread carpenter’s glue on the wood dowel and tap it into the hole carefully with a hammer until it is flush with the door jamb. The glue will hold the dowel inside the stripped hole, giving you a fresh, flat surface to reattach the hinge.
Bore out and plug the remaining stripped screw holes using this same method. If excess glue oozes out of the holes onto the surface, wipe it away with a rag to prevent it from drying. Otherwise, it could make the surface uneven. Check your wood glue’s recommended waiting time to make sure it is dry before repositioning the hinge leaf.
Finally, secure the hinge by driving screws into the dowel-reinforced holes. You can attach a 1/8-inch drill bit to your electric drill and drill into each dowel to create pilot holes for the screws — that should make it easier to reattach the hinges.
Stuck Hinge Pin
In an older home, chances are the doors have been latched in place for a long time. There are different reasons why this might happen. Classic examples include leaving the door closed for a long time, neglecting the hinges or painting over them. Depending on the age and general condition of the door’s hinges and pins, it may be difficult to remove them. You can nudge the hinge pin loose using a few tools you probably have lying around the garage.
How to Remove and Fix a Stuck Hinge Pin
If the hinge pins are stuck, the following steps can help you remove them:
- Get a drive pin punch or 16d sinker nail to use as a makeshift punch. Do not use a screwdriver to remove a hinge pin, especially if your hinge is made of softer alloy like brass. Screwdrivers will damage your hinge pin head and knuckle.
- Place the punch at the bottom of the hinge barrel where the hinge pin terminates. If you’re using a 16d nail, place the pointed end of the nail on the bottom of the hinge barrel.
- Gently hammer the pin upward. It might take some time to get the pin to move, but it should eventually release with enough hammering unless it is rusted in place.
- If your hinge pin is rusted and stuck in the hinge barrel, you’ll need a penetrating oil to break down the corrosion. Products like Liquid Wrench and PB Blaster are excellent options for this application. Apply the oil and give it time to work into the hinge barrel — 15 minutes minimum.
- You can reuse the hinge components if they are in good shape, but you must lubricate them to prevent them from getting stuck in the future. Dry lubricants are best, but you can also use household items like cooking oil, petroleum jelly, paraffin wax, or dish soap. Take care to apply only a thin layer to minimize mess.
Squeaky Hinges
There are several possible explanations for your squeaky hinges. For example, it could be that the space between the door and the door jamb is narrow, causing them to rub against each other. Another common reason is that the door’s hinges have aged, which is often the case. Whatever the cause, there is a way to stop the door from creaking whenever you open or close it.
Lubricating the Hinges
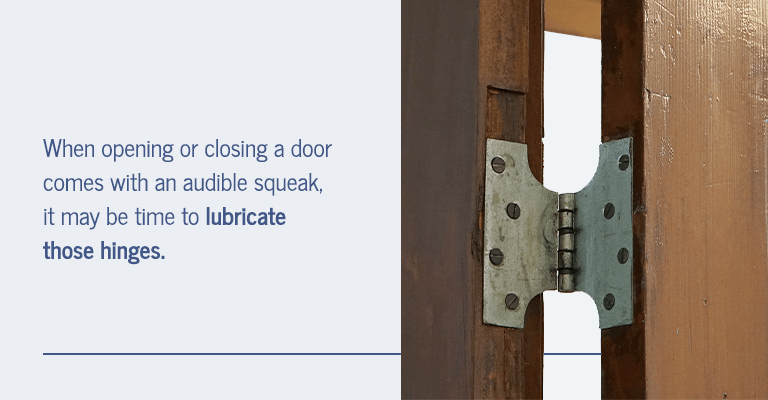
When opening or closing a door comes with an audible squeak, it may be time to lubricate those hinges. Fortunately, you can fix this common hinge problem without removing the door from the frame. While a petroleum-based penetrating oil like WD-40 is excellent for this purpose, you can also use bar soap, petroleum jelly, or olive oil. To lubricate your squeaky hinges, work through the following steps:
- First, loosen each hinge pin by gently tapping it free with a hammer or mallet. You can use a 16d nail as a makeshift punch if you’re having trouble getting the hinge pin to loosen.
- Once the pin is loose, lift it out. Lift the door handle to relieve pressure if the pin should happen to bind. Remember to work on one hinge at a time and keep the door closed.
- If the door has three hinges, remove the middle one last. You may need an extra hand for this job. Otherwise, place a piece of wood under the door to support its weight and keep it level.
- Once the hinge pin is loose, clean it using a brush and a solvent.
- Let it dry, and gently polish the surface with fine sandpaper.
- Lightly coat the hinge pin with a thin layer of petroleum jelly or another at-home lubricant, like bar soap.
- Dab a little lubricant in the top of the pin slot.
- Reverse the process and firmly attach the door to the frame.
If you remove the hinges, rub them with white grease, petroleum jelly, or hot wax from a paraffin candle before reinstallation. This protective layer will impart them with rust resistance and allow them to move freely.
While you can treat your hinges with spray lubricant to accomplish this goal, a dry or sticky substance is often less messy and easier to use because it stays on the surface when applied. Regardless of how you decide to lubricate your hinges, be sure to have a clean rag close by to wipe up excess.
Unlevel Jamb or Leaning Door
When the door jamb isn’t level, it can cause the door to lean. This can lead to issues such as:
- Difficulty opening and closing doors: It isn’t easy to open and close the doors when they lean because the hinges cannot work correctly. Besides holding the doors off the ground, the hinges let you move the door quickly back and forth. This function is disrupted when there is an imbalance.
- Irregular gaps: Have you noticed those uneven gaps at the corners of your door when you stand at a certain angle? That means your door is slanting towards one side. Fixing the hinges can put the door back in position.
- Misaligned locks and doorknobs: Imagine investing in a door only to see the locks and knobs misaligned. Besides disrupting your home’s beauty, this issue makes it difficult to lock your door, meaning your privacy and safety are compromised. The best solution is investing in higher-quality replacement hinges, especially if the problems remain after several fixes.
How to Fix an Unlevel Jamb or Leaning Door
You could take the door down and reset the jamb, but correcting the gap difference using hinge shims is usually a much easier way to get the door working properly again. However, you will probably need to reset the jamb if the gap difference is any more than 3/16 inches.
Here’s how to fix this problem:
- Measure the gap between the top and bottom of the door and subtract the measurements to determine the difference and type of shim you need.
- A thin cardboard shim is an adequate solution for some hinge problems. However, unless the gap is extremely minimal, you’re likely better off buying specialized hinge shims. These spacer pieces are pre-drilled and easy to use, and you don’t have to remove the hinge all the way to place them. Plus, because they’re made of high-impact plastic, they won’t compress like cardboard, which makes them ideal for steel doors and heavy entry doors.
- While the hinges are still in place, open the door and wedge a piece of wood under it to support the weight and prevent the door from moving as you unscrew it.
- Remove the screws using a screwdriver or a drill with the appropriate bit. If you must remove all three hinges, save the middle one for last.
- Slide the shim behind the hinge that needs extra spacing. You want all three hinges to be on the same plane to prevent the door from binding. Your top and bottom hinges will likely need the most shimming, and the middle hinge will likely need some minor shimming as well.
- Drive the screws back in, checking the operation of the door as you go.
- Add or remove shims until the door is straight and working properly.
Door Opening on Its Own
Hinges hold doors in position, so if yours opens as it pleases, something is wrong. The standard explanation is that your door jamb is out of plumb, affecting the hinge function. The effect is that your door loses balance and easily shifts towards the direction of the tilt. The question is, what causes your door to tilt? There are many possible reasons.
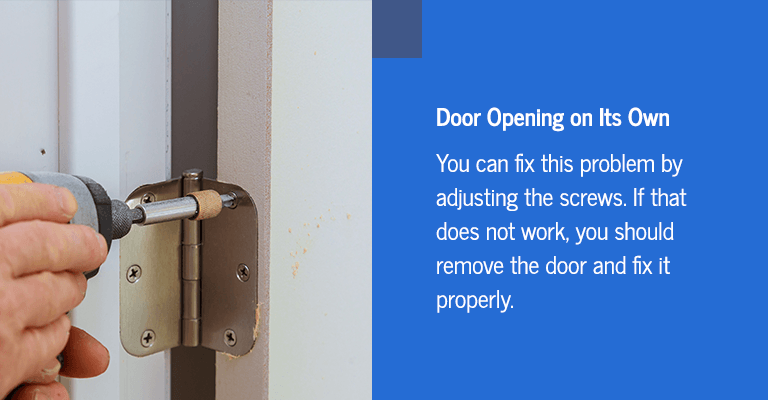
It may be that the door was improperly fixed the first time or that the door carried some heavy load, causing the hinges to shift. It can also result from wall and door settling, causing the entire jamb to be off. You can fix this problem by adjusting the screws. If that does not work, you should remove the door and fix it properly. Here is a step-by-step guide:
- Close the door and check the spacing on the top and latch side.
- Determine the part it leans towards.
- Wedge the door at the bottom and remove the hinges with a screwdriver.
- Clean the surface and shim the area until the door balances. You can use a spirit level to check.
- Adjust the wedge such that it holds the door in the correct position.
- Screw the hinge pins tightly to hold the door in place.
In some cases, tightening your screws may not fix this problem. If your door still swings open or closed, the jamb is likely out of plumb. In these cases, you need to use self-closing spring hinges or reverse spring hinges to correct the problem. You can also correct the jamb.
Rusty Hinges
Rusted hinges affect the door’s appearance and functionality. Rust occurs when the hinges are exposed to moisture and humidity over an extended period. Rusted hinges can make it difficult to open and close the door. The good news is that the problem is often fixable.
How to Fix a Rusty Hinge
Here are a few steps to fix a rusty hinge:
- Inspect the hinges: Examine the hinges on your door to see the extent of rust. Pay attention to the areas where the metal surfaces contact each other. This inspection will help you determine whether the hinge is worth saving. If so, you’ll want to remove it for the next steps so you don’t damage the door or the jamb.
- Brush away surface rust: Use steel wool or a wire brush to scrub away loose rust from the surface of the hinges. Try to remove as much accumulation as possible.
- Apply rust remover: Apply commercial rust remover or homemade solutions like lemon juice or vinegar to the hinge. Wait for a few minutes to allow the rust to dissolve.
- Scrub the hinge: Scrub the hinge with the steel wool or wire brush to remove any remaining rust. Aim at getting a clean, rust-free surface.
- Clean the hinge: Wash the components with water and wipe them with a clean cloth. Make sure the hinge is completely dry because moisture will invite further rusting.
- Lubricate the hinge: Lubricant protects the hinges against rust and helps the moving parts work more smoothly. As noted above, you can use penetrating oil products like WD-40 or household items like cooking oil or petroleum jelly.
It’s vital to inspect and lubricate your hinges regularly to prevent corrosion. Periodic maintenance helps you protect your investment and staves off the need to spend time and energy buying cleaning products and scrubbing off rust. If corrosion is left unchecked, hinges will eventually rust to the point where the only option is to replace them.
Remember, hinges are pivotal in how your doors function, so it’s always best to choose quality. It’s better to replace inferior hinges now than spend hours and money reviving them in the future.
Get Quality Hinges From HardwareSource
Knowing how to fix a door hinge is crucial, but any repair is only temporary if you buy inferior products. Hinges are perhaps the most used components on a door, so you want to choose products with a long life span. With a little preventive maintenance and a premium product, you can expect hinges that last for decades, saving you money, time, and effort.
At HardwareSource, we understand how vital reliable door hinges are to homeowners. We invest resources into finding solutions that eliminate most of the problems our clients face. We have supplied homes with high-quality hinges since 1892 and offer a wide selection of replacement door hinges to fit virtually any entryway.
Browse our full range online to find the perfect hinge, or fill out our Hinge Finder Form now for assistance determining which of our products is best for your application.
